The development of projects with Git is tightly integrated with the remote repository of your choice. The following guide will show you how to set up GitHub integration. If you are using another hosting service, such as Bitbucket, follow the setup for your hosting service.
The GitHub integration utilizes GitHub Actions. GitHub Actions is a continuous integration and continuous delivery (CI/CD) platform that allows you to automate your build, test, and deployment workflows. You can learn more about GitHub Actions here.
What will we build
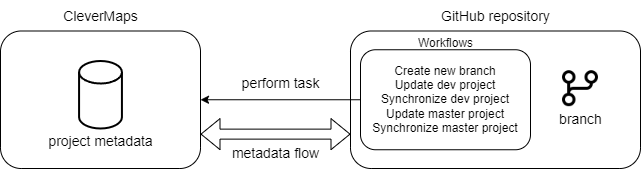
This guide will walk you through the process of creating a GitHub repository specifically designed for the collaborative development of project metadata in CleverMaps.
The repository will contain workflows that perform tasks, such as creating a branch and a development project, updating project metadata from the repository, and synchronizing project metadata from project to repository. You will learn about these workflows in the following guide, where you will also learn how to develop a project using Git and workflows.
If you are joining an already set up project, clone the repository, and you’re ready.
Creating new repository
Start by creating a new repository on GitHub.
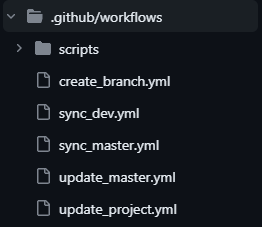
Download the Github_workflows.zip and place the content of the zip file in the repository. The zip contains the .gitignore file and a .github directory with workflows. Hint: If you can't see the content in file explorer, enable Show hidden files.
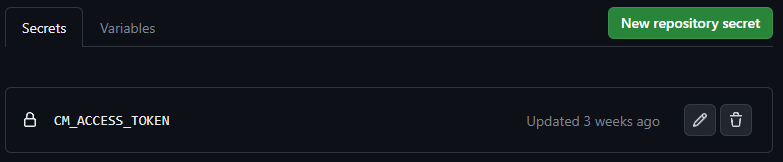
Add CleverMaps access token to the GitHub repository secrets. Name the secret CM_ACCESS_TOKEN and paste the access token. Save the secret.
Optional: Create a new account in CleverMaps. The new account will perform the role of a technical user specifically for system-to-system communication.
If CleverMaps have assigned your organization an organization ID (if not, skip this step), add it to the GitHub repository variables. Name the variable CM_ORGANIZATION_ID and paste the organization ID. Save the variable.
If you already have a CleverMaps project created that you want to integrate with Git repository, you can skip this step.
Create a project in CleverMaps. This project will be your master project (project mirroring the main branch).
Ensure that the user whose token you have added to repository secrets is assigned ADMIN user role for the master project.
Add the project ID of the master project to the repository variables. Name the variable CM_MASTER_PROJECT and paste the project ID. Save the variable.

You have successfully created your project repository. You can continue to Develop projects with Git.
Other
Running workflows manually
All the workflows you have added to the repository can be run manually. You can follow this tutorial to find out how.
Branch-project relation
The branch and project are in 1:1 relation, meaning one branch is connected to one CleverMaps project.
The main branch is connected to the master project by repository variables. The other branches have a special naming scheme that indicates to which project they are connected. The scheme is <projectid>/<branch_name>.
Was this helpful? Do you have any additional questions? Do not hesitate to contact us at support@clevermaps.io or chat bubble in the bottom right corner of this page.