This guide introduces how you and your team can develop projects in CleverMaps with Git.
Before you begin
Read the following list of nuances that the development process with Git is built upon:
-
Metadata removed in a repository is not removed in the project when running update project workflows. You can remove the metadata from the project using CleverMaps Shell or CleverMaps Studio. Metadata can have references between them (learn more about Metadata model), and removing them automatically could result in unforeseen consequences. Therefore, we believe that developers should consciously remove metadata from the projects when removing them from the repository.
-
When committing metadata to the repository, make sure you are committing only metadata that is either unwrapped or is part of the master project (wrapped in the master project wrapper). For more information about the wrapper, you can read the Dump object wrapper section.
-
The master project is a CleverMaps project mirroring the default branch (usually named main/master).
-
The development project is a CleverMaps project bound to the development branch.
-
See how to run workflows in your platform - GitHub, BitBucket.
|
GitHub workflow names |
Bitbucket workflow names |
Link to documentation |
|---|---|---|
|
|
|
|
|
|
|
|
|
|
|
|
|
|
|
|
|
|
|
Working with the master project and the main branch
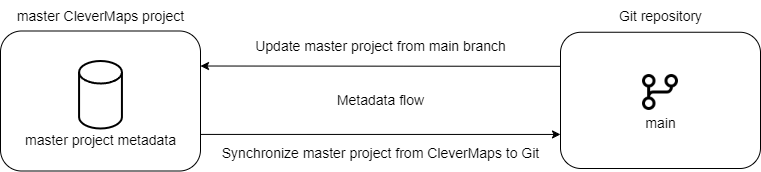
The following section will explain actions you can perform with your master project. The master project is bound to the main branch and is the project you are integrating with Git.
Update master project from the main branch
The Update master project workflow is a workflow that pushes changes you’ve made in the repository to the master project in CleverMaps. After the workflow has finished successfully, you can see your changes in the master project.
The workflow is automatically triggered when a commit is pushed into the main branch but can also be triggered manually.
Reminder: Metadata removed in a repository is not removed in the project when running update project workflows. See logs of the workflow in the step Run replace content python script, which metadata files should be removed.
You can remove the metadata from the project using CleverMaps Shell or CleverMaps Studio.
Synchronize master project from CleverMaps to branch
The Synchronize master project workflow will download the metadata from the master project and commits the changes to the main branch.
The workflow is set to run automatically every hour and can be triggered manually and can also be triggered manually.
Working with development branches and projects
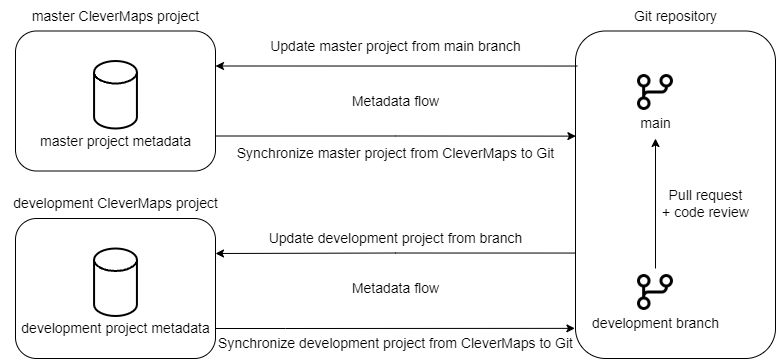
When collaborating with other people on the development of a project in CleverMaps, you and your colleagues should adhere to the principles of branching. For every new feature you’re developing, there should be a development branch, where the development is done.
Create development branch
When developing a new feature in a project, the best practice is to create a new branch. To make development in branches as easy as possible, we have developed Create new branch workflow.
The workflow will create a new branch and also a project in CleverMaps. Bounding the development branch to a development project will allow you to see your changes (after running the Update development project workflow) in the CleverMaps.
When starting the workflow, specify the name of the branch (without spaces) and the project's name in CleverMaps. You can also invite a user to the project by typing an email address.
Inviting a user to the project can be helpful when collaborating with multiple people on project development. The project created by workflow will be owned by the user whose access token is saved in repository secrets. If the access token is not yours, fill in your email address, and you will be invited to the project.
However, don't remove the user whose access token is saved in the repository. By removing the access, you would block the workflows from accessing the project's metadata, breaking the workflows.
You can also create a development branch with git checkout -b <branch_name>. However, by creating the branch this way, you won’t have a development project in CleverMaps. This approach can be useful when working on a quick bug fix and you know that you don’t need to view your change in a development project. If you realize, when working in the branch, that you would like to have a development project, you can always create a new branch with Create new branch workflow and cherry-pick your commits and move them to the new branch.
Update development project from branch
Once you have committed and pushed your changes to the repository, you can run the Update dev project workflow to push the changes to the CleverMaps project. After running the workflow, you can see the changes in the project.
Reminder: Metadata removed in a repository is not removed in the project when running update project workflows. See logs of the workflow in step Run replace content python script, which metadata files should be removed.
You can remove the metadata from the project using CleverMaps Shell or CleverMaps Studio.
Synchronize development project from CleverMaps to branch
You can change the CleverMaps project with CleverMaps Shell or in CleverMaps Studio. To keep the repository up-to-date with the project, run the Synchronize development project workflow. The workflow will download the metadata from the project and commit the changes to the repository.
Pull request and code review
Once your feature is ready, you should create a pull request. However, before you do so, you should run the Synchronize master project workflow to download all the changes from the master CleverMaps project and compare your development branch with the up-to-date main branch.
Then create the pull request. Having your code checked by another developer in a code review is a common practice. After the successful review process, your feature is ready to be merged. Run the Synchronize master project workflow again. Running it again will ensure that the main branch is up-to-date with the master project and that there are no conflicts in your code. If there are no conflicts, you can merge your pull request.
After merging your pull request, the Update master project workflow is automatically triggered. After the workflow has finished, you can see your changes in the master project.
Adding production project
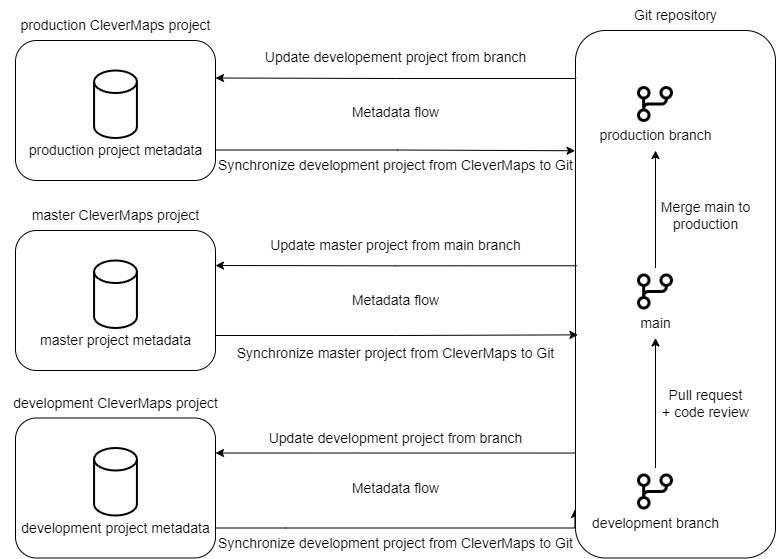
A common software development practice is having separate staging and production environments. The staging environment is there to merge and test all the features and ensure they work together. The production environment is the final product that the user works with.
You can follow this practice by creating a special branch and CleverMaps project (using Create new branch workflow). The production branch can utilize the same workflows as the development branches - Update development project from branch and Synchronize development project from CleverMaps to branch.
Deploying changes to production project
Deploying changes to the production project is a straightforward process. Merge the main branch to the production branch. After that run the Update development project from branch on the production branch. The workflow will update the production project with the latest changes from the production branch.
Reminder: Metadata removed in a repository is not removed in the project when running update project workflows. See logs of the workflow in step Run replace content python script, which metadata files should be removed.
You can remove the metadata from the project using CleverMaps Shell or CleverMaps Studio.
Was this helpful? Do you have any additional questions? Do not hesitate to contact us at support@clevermaps.io or chat bubble in the bottom right corner of this page.